Adapter:
import android.content.Context;
import android.support.v7.widget.RecyclerView;
import android.view.LayoutInflater;
import android.view.View;
import android.view.ViewGroup;
import android.widget.TextView;
import java.util.List;
import gurubhai.fastxpo.restarent.R;
public class RecyclerAdapter extends RecyclerView.Adapter<RecyclerView.ViewHolder> {
private static final int TYPE_ITEM = 1;
private List<String> mItemList;
public RecyclerAdapter(List<String> itemList) {
mItemList = itemList;
}
@Override
public RecyclerView.ViewHolder onCreateViewHolder(ViewGroup parent, int viewType) {
Context context = parent.getContext();
if (viewType == TYPE_ITEM) {
final View view = LayoutInflater.from(context).inflate(R.layout.recycler_item, parent, false);
return new RecyclerItemViewHolder(view);
}
throw new RuntimeException("There is no type that matches the type " + viewType + " + make sure your using types correctly");
}
@Override
public void onBindViewHolder(RecyclerView.ViewHolder viewHolder, int position) {
RecyclerItemViewHolder holder = (RecyclerItemViewHolder) viewHolder;
String itemText = mItemList.get(position); // header
holder.setItemText(itemText);
}
public int getBasicItemCount() {
return mItemList == null ? 0 : mItemList.size();
}
@Override
public int getItemViewType(int position) {
return TYPE_ITEM;
}
@Override
public int getItemCount() {
return getBasicItemCount(); //
}
public class RecyclerItemViewHolder extends RecyclerView.ViewHolder {
private TextView mItemTextView;
public RecyclerItemViewHolder(final View parent) {
super(parent);
mItemTextView = (TextView) parent.findViewById(R.id.itemTextView);
}
public void setItemText(CharSequence text) {
mItemTextView.setText(text);
}
}
}
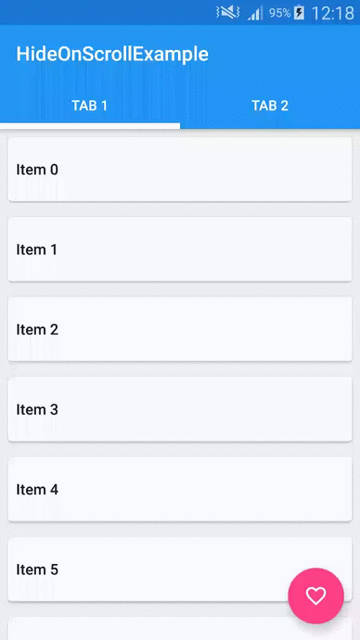
MainActivity.java
public class MainActivity extends AppCompatActivity {
@Override
protected void onCreate(Bundle savedInstanceState) {
super.onCreate(savedInstanceState);
setContentView(R.layout.activity_main);
initToolbar();
initViewPagerAndTabs();
}
private void initToolbar() {
Toolbar mToolbar = (Toolbar) findViewById(R.id.toolbar);
setSupportActionBar(mToolbar);
setTitle(getString(R.string.app_name));
mToolbar.setTitleTextColor(getResources().getColor(android.R.color.white));
}
private void initViewPagerAndTabs() {
ViewPager viewPager = (ViewPager) findViewById(R.id.viewPager);
PagerAdapter pagerAdapter = new PagerAdapter(getSupportFragmentManager());
pagerAdapter.addFragment(ItemSelectionFragment.createInstance(20), getString(R.string.tab_1));
pagerAdapter.addFragment(ItemSelectionFragment.createInstance(4), getString(R.string.tab_2));
viewPager.setAdapter(pagerAdapter);
TabLayout tabLayout = (TabLayout) findViewById(R.id.tabLayout);
tabLayout.setupWithViewPager(viewPager);
}
static class PagerAdapter extends FragmentPagerAdapter {
private final List<Fragment> fragmentList = new ArrayList<>();
private final List<String> fragmentTitleList = new ArrayList<>();
public PagerAdapter(FragmentManager fragmentManager) {
super(fragmentManager);
}
public void addFragment(Fragment fragment, String title) {
fragmentList.add(fragment);
fragmentTitleList.add(title);
}
@Override
public Fragment getItem(int position) {
return fragmentList.get(position);
}
@Override
public int getCount() {
return fragmentList.size();
}
@Override
public CharSequence getPageTitle(int position) {
return fragmentTitleList.get(position);
}
}
}
Fragment.java:
import android.os.Bundle;
import android.support.v4.app.Fragment;
import android.support.v7.widget.LinearLayoutManager;
import android.support.v7.widget.RecyclerView;
import android.view.LayoutInflater;
import android.view.View;
import android.view.ViewGroup;
import java.util.ArrayList;
import java.util.List;
import gurubhai.fastxpo.restarent.R;
import gurubhai.fastxpo.restarent.adapter.RecyclerAdapter;
public class ItemSelectionFragment extends Fragment {
public final static String ITEMS_COUNT_KEY = "PartThreeFragment$ItemsCount";
public static ItemSelectionFragment createInstance(int itemsCount) {
ItemSelectionFragment partThreeFragment = new ItemSelectionFragment();
Bundle bundle = new Bundle();
bundle.putInt(ITEMS_COUNT_KEY, itemsCount);
partThreeFragment.setArguments(bundle);
return partThreeFragment;
}
@Override
public View onCreateView(LayoutInflater inflater, ViewGroup container, Bundle savedInstanceState) {
RecyclerView recyclerView = (RecyclerView) inflater.inflate(
R.layout.fragment_item_selection, container, false);
setupRecyclerView(recyclerView);
return recyclerView;
}
private void setupRecyclerView(RecyclerView recyclerView) {
recyclerView.setLayoutManager(new LinearLayoutManager(getActivity()));
RecyclerAdapter recyclerAdapter = new RecyclerAdapter(createItemList());
recyclerView.setAdapter(recyclerAdapter);
}
private List<String> createItemList() {
List<String> itemList = new ArrayList<>();
Bundle bundle = getArguments();
if (bundle != null) {
int itemsCount = bundle.getInt(ITEMS_COUNT_KEY);
for (int i = 0; i < itemsCount; i++) {
itemList.add("Item " + i);
}
}
return itemList;
}
}
activity_main.xml
<?xml version="1.0" encoding="utf-8"?>
<android.support.design.widget.CoordinatorLayout xmlns:android="http://schemas.android.com/apk/res/android"
xmlns:app="http://schemas.android.com/apk/res-auto"
android:id="@+id/coordinatorLayout"
android:layout_width="match_parent"
android:layout_height="match_parent">
<android.support.design.widget.AppBarLayout
android:id="@+id/appBarLayout"
android:layout_width="match_parent"
android:layout_height="wrap_content">
<android.support.v7.widget.Toolbar
android:id="@+id/toolbar"
android:layout_width="match_parent"
android:layout_height="?attr/actionBarSize"
android:background="?attr/colorPrimary"
app:layout_scrollFlags="scroll|enterAlways" />
<android.support.design.widget.TabLayout
android:id="@+id/tabLayout"
android:layout_width="match_parent"
android:layout_height="wrap_content"
app:tabIndicatorColor="@android:color/white"
app:tabIndicatorHeight="6dp"
app:tabSelectedTextColor="@android:color/white"
app:tabTextColor="@android:color/white" />
</android.support.design.widget.AppBarLayout>
<android.support.v4.view.ViewPager
android:id="@+id/viewPager"
android:layout_width="match_parent"
android:layout_height="match_parent"
app:layout_behavior="@string/appbar_scrolling_view_behavior" />
</android.support.design.widget.CoordinatorLayout>
recycler_item.xml
<?xml version="1.0" encoding="utf-8"?>
<android.support.v7.widget.CardView xmlns:android="http://schemas.android.com/apk/res/android"
xmlns:card_view="http://schemas.android.com/apk/res-auto"
android:layout_width="match_parent"
android:layout_height="wrap_content"
android:layout_gravity="center"
android:layout_margin="8dp"
card_view:cardCornerRadius="4dp">
<TextView
android:id="@+id/itemTextView"
android:layout_width="match_parent"
android:layout_height="?attr/listPreferredItemHeight"
android:gravity="center_vertical"
android:padding="8dp"
style="@style/Base.TextAppearance.AppCompat.Body2"/>
</android.support.v7.widget.CardView>
Gradel:
compile 'com.android.support:appcompat-v7:23.4.0'
compile 'com.android.support:design:23.4.0'
compile 'com.android.support:recyclerview-v7:23.4.0'
compile 'com.android.support:cardview-v7:23.4.0'
Thank you
 icon from the toolbar. Android studio installs the app on your AVD and starts it and if everything is fine with your setup and application, it will display following Emulator window: